If you are a car owner, you have undoubtedly encountered the distinction between license and title. The title of the car is a certificate of ownership. If I have title I can tear it down, rebuild it, repaint it, scrap it, or sell it. Notice, I didn't say I could drive it. In order to drive the car, I have to have a license. In fact, I have to have two licenses. One license is for the car, giving me the right to have it on the road. The other is a license for me to drive the car. Fortunately, I don't have to have a separate driver's license for every car I drive. That is a license on me as a driver, not on the car itself.
Is there any comparison between this model and the purchase of books? (or by extension, music, movies, and other media?) This might go nowhere, but let me try to draw some comparisons.
If I buy a paper-based book at a bookstore, I own the book. No one believes that they own the ideas in the book or the words that were written anymore than they own the patents on their automobile or the logo that identifies its manufacturer. So, as a physical object, I have title to the book. I can do just about anything to that physical copy I want to. I can read it, loan it to friends, cut it up and paste it together as a work of art, give it away, sell it, or burn it. I don't need any additional license to the book or as a reader to use or abuse the physical object in any way I want to. (Though that has some interesting implications. Perhaps we should consider issuing reading licenses that authorize people to read??? Another topic at another time.) What I can't do is deprive the author/publisher of their right to the creative work and their right to profit from it. No big deal since the cost of copying the book, printing it, and selling it is generally prohibitive anyway.
Somehow we are expected to believe, however, that buying an eBook gives us a different set of rights. We are told by those who hold that eBooks are software and subject to the rules of software publishing (which really don't make sense in the first place) that we do not have title to the eBook we have purchased. We have a license to read the eBook. We cannot loan it to friends, cut it up and paste it together as a work of art, give it away, sell it. I suppose we can destroy it, erase it, but that simply amounts to a revocation of license. In one way or another, the entity of the eBook is not supposed to be the same as the entity of a paper book because this will cause the boogeyman to descend upon all creation and western civilization will collapse.
I believe differently. I was told by a reader of my paper book For Blood or Money, that the copy he had purchased had been read by four other people. I'm pleased. Everyone had enjoyed the book. But I only made one sale. Have they cheated me? No. They didn't steal my words, make copies, sell them, or cheat me out of revenue. They did what was completely legal for them to do. I expect the book will one day end up in a garage sale and if I'm lucky someone will pay fifty cents for it and five more people will read it before it is too tattered and worn to give away again. One of my goals is that individual sale of a copy of my book will represent five readers.
Take the next situation. Another reader, this time of the eBook version, put a copy on both her eReader and her husband's. According to the industry standard, I am supposed to be incensed because she only paid for one copy! She was only supposed to be licensed to read it on her reader. She should have loaned her reader to her husband because that is the only road it was licensed to be driven on.
Poppycock!
That same reader returned and bought 8 copies of the paper book to give as gifts! I'm hoping she lets three more people read her eBook version.
We should have exactly the same rights to an eBook as we have to a paper book. No, you can't just keep copying it and selling or giving it away. But you should be able to read it, loan it, tear it apart or tear it up, sell it, or destroy it. Civilization will not end. My royalties won't suffer. I sell books, not licenses. And I sincerely hope that my books are of high enough quality both in content and construction that they average five readers per every copy sold.
Tuesday, January 18, 2011
Thursday, September 23, 2010
Adding pictures to your book
Books are not just linear text—at least not all of them. Without getting into a philosophical discussion about the evolution of the book and what the next generation will look like, suffice it to say that we like pictures. Pictures and graphic elements are used to illustrate, illuminate, and decorate. In our fairytale book, The Obstructive Bridge, we are going to add a decorative initial cap to the first paragraph. In this lesson we will cover both the new html element (
First, the

You have now added a graphic element to your eBook. We will deal more extensively with images in a future chapter and discuss some of the kinds of files you can use for images, different ways of displaying them in your text, and how to organize them in your document. Next, we’ll add several new chapters to the eBook.
<img>) and additional styling that is needed to make it line up where we want it.First, the
.ZIP file “Bridge.zip” should be copied to your hard drive and unpacked. This new package has the same files as previous packages but also includes a decorative image named “o.jpg.”- In your text editor, open the file “content.html.” The image element is an empty element (has no end tag). It contains three necessary elements: The “img” element name, the url of the graphic, and alternate text (alt) that will be read by screen readers or displayed on mouse-over by devices that do not display images.
- Locate the first
<p>tag in the document. We are going to replace the “O” in ONCE with a graphic, so delete the “O.” Immediately following the<p>tag, insert the following line:<img src="o.jpg" alt="Once" /> - The first line of the html file should now read:
<p><img src="O.jpg" alt="Once" />NCE UPON A TIME,
That is all that needs to be done to theHTMLfile, so save it and close it. Next we will work on the style sheet to indicate how we want the image to be displayed. Open “styles.css” in your text editor. - We will add two lines in the style sheet. One line will remove the indent from the first paragraph of text that follows a
<h1>heading. The second will cause the image to “float” to the left of the paragraph. This means that it will line up with the top of the line of text and the text will wrap around it. At the end of the css file add the following two lines:h1 + p { text-indent:0; }
img { float:left; } - Save and close “styles.css.” Open “Bridge.opf” in your text editor. We need to add the graphic element to the manifest so that readers understand it is part of this eBook. Locate the “manifest” portion of the file and before the closing
</manifest>tag add the following line:<item id="o" href="O.jpg" media-type="image/jpeg" /> - Save and close the file, then drag and drop the three changed files into the
OEBPSfolder in your.ZIPfile. Change the extension to.ePUBand open your book in a reader.

You have now added a graphic element to your eBook. We will deal more extensively with images in a future chapter and discuss some of the kinds of files you can use for images, different ways of displaying them in your text, and how to organize them in your document. Next, we’ll add several new chapters to the eBook.
Thursday, September 2, 2010
Preparing a manuscript
I spent 3 hours Tuesday converting one chapter of a manuscript that was submitted to me to a propper
Finally, a word about images. Yes, I want to see the images in the manuscript where they belong, but don’t do a lot of formatting to make them appear right. Just create a new paragraph with the image in it and continue. Don’t try to float the image, annotate it, or position it. I will need each original image as a separate file as well. When I do either the print/
Preparing your manuscript properly will cut as much as 30%-50% off the cost of converting it to either eBook or print. You could use the savings, and I could use the extra time.
HTML file for formatting as an ePUB. The authors inadvertently broke virtually every rule of manuscript preparation before giving it to me. I got to thinking that maybe people still don’t understand the fundamentals, so here are a few of the rules that I’d like to see adhered to when I convert a manuscript to ePUB or to a print/PDF layout.- No extra spaces of any kind. If you work in
HTMLor other W3C formats, you’ll discover that extra whitespace is ignored when the the page is laid out, so what is the big deal? It is confusing to see space in the source file that doesn’t translate into the layout. We use space (like indenting nested levels) to mean specific things in the source file, so don’t make the job harder by putting in extra space. I use search and replace to add the first batch of element tags into the file. If I replace all returns with</p><p>, I will get double paragraph spacing in the result. If this is the same file that you will submit to a publisher (like me) for print orPDFlayout, all that extra space has to be stripped out to assure a good book design. Help us by not putting it in. What are extra spaces?- Double spaces after punctuation
- Double enter after a paragraph
- Tabs of all sorts (these are often converted to spaces in
.TXTfiles)
- Use styles. Distinguish between headings and body text by using the “Heading 1,” “Heading 2,” and “Normal” or “Body Text” styles on the paragraph. When doing a print layout, we can actually import these styles into the layout program and make the design of the book 100% easier to implement. When preparing for
HTML, we can search the styles and add the appropriate element tags quickly and easily. - Don’t use a lot of custom overrides for font-styles to indicate different speakers, thoughts, places, times, emphasis, or sidebars. The only font-styles I want to see are:
- Italics to indicate internal thoughts of a character, foreign words, book titles, and very occasionally a word for which the emphasis changes the meaning of the sentence. Don’t use italics for anything else. Ever.
- Bold to indicate a lead-in sub-heading that is part of the paragraph. Bold may also be a part of a style (like Heading 1) to help distinguish a heading from surrounding text. Any font-style or font-weight that is part of a heading or other style definition is fine since that will all be subject to what I define the style to be when I do the layout. Rarely, bold may be used for indicating someone is shouting, or in non-fiction to indicate a class of information (like Warnings).
- Never use underlining. If I see this, I automatically convert it to Italics, so unless you are typing a manuscript on a Royal manual typewriter that doesn’t have Italics, don’t use underlining. The only place I want underlining is in Web addresses and email addresses. These will be added automatically by your word processing program or by my layout.
- Avoid ALL CAPS whenever possible. This can be used sparingly for shouted lines, but if you have a character who shouts all the time, let “he shouted” suffice. Anytime you use all caps (Shift Lock) when you type, I have to retype in lower case and then apply a style to it.
- Use special characters. This is really critical because I have to read every line of your manuscript to check for this. Double dash (--) should be an em-dash (—). Check your typographer’s quotes. We use ' and " to indicate feet and inches and for special codes in
XMLelements. Quotes look like ‘ ’ and “ ”. If your word processing program converts these automatically, great! Just make sure they are pointing the right direction. The word processing program will convert 'Tis to ‘Tis instead of ’Tis. If your word processing file has these special characters in it, they will be preserved when I convert the file to a UTF8 text file.
Finally, a word about images. Yes, I want to see the images in the manuscript where they belong, but don’t do a lot of formatting to make them appear right. Just create a new paragraph with the image in it and continue. Don’t try to float the image, annotate it, or position it. I will need each original image as a separate file as well. When I do either the print/
PDF layout or the HTML, I will have to import or link to the original images. This will have to be done manually. Don’t make the job harder.Preparing your manuscript properly will cut as much as 30%-50% off the cost of converting it to either eBook or print. You could use the savings, and I could use the extra time.
Wednesday, August 25, 2010
Make it Pretty
In the three quick lessons that you've tried so far, you've created a valid
I've provided another test file for you at the eBook download site. This one is titled "StnGeorge.zip". Just click on the link and download the zip file. Once the file is on your computer, make a copy of it and change the extension from

Here are the problems: The headline is at the left, the paragraphs are not indented, the paragraphs have space between them, and the type looks too crowded. Those are the things we are going to change.
Here's how:
Save all the files and add them to the

ePUB eBook and have tested it with your on-screen reader or reading device. It worked. But you've probably also noticed that it didn't look that great. Now we are going to add a file with six lines of type in it and add a line each to the .HTML and .OPF files. These eight simple edits will dramatically change the look of your eBook.I've provided another test file for you at the eBook download site. This one is titled "StnGeorge.zip". Just click on the link and download the zip file. Once the file is on your computer, make a copy of it and change the extension from
.ZIP to .ePUB. Then open the eBook in your on-screen reader (like Adobe Digital Editions). This simple parable, unlike the Aesop example, is a few pages long and has several paragraphs.
Here are the problems: The headline is at the left, the paragraphs are not indented, the paragraphs have space between them, and the type looks too crowded. Those are the things we are going to change.
Here's how:
- In your text editor create a new document. Copy into the document the following lines:
body {}
h1 { text-align:center; }
p { margin:0;
 line-height:1.5;
 text-align:justify;
 text-indent:2em; }
Save the new file with the name "styles.css". - Open the file
bridge.opfand edit the section called<manifest>. Currently the section looks like this:<manifest>
<item id="content" href="content.html" media-type="application/xhtml+xml"/>
<item id="toc" href="bridge.ncx" media-type="application/x-dtbncx+xml"/>
</manifest>
We will add one line before the close tag for the manifest as follows:<item id="css" href="styles.css" media-type="text/css"/> - Open the
content.htmlfile. We need to tell this content file where to look for its styles. This information goes in the<head>element. When we add the single line the element will look like this:<head>
<title>The Obstructive Bridge</title>
<link href="styles.css" rel="stylesheet" type="text/css" />
</head>
Save all the files and add them to the
OEBPS folder in the .ZIP file. Change the file extension to .ePUB and open the new book in your reader. You've made a much prettier eBook with the addition of eight simple lines. In the future, you'll learn greater control over styles and eBook appearance. For now, though, you've create a great looking eBook with a minimum of effort!
Monday, August 16, 2010
Organize and Package
We have all the necessary files created to make an
Does it have to look just like this? The practical application of the spec allows some variation to the way things are set up, but this is the preferred organization. If you are just getting started with eBooks or are planning to distribute your books through a company that validates the code (like iPad store) stick with the recommended format and don't vary. You might as well do it right from the beginning.
Is this really all there is to it? Of course not. In the next lesson, we'll talk about making it look pretty!
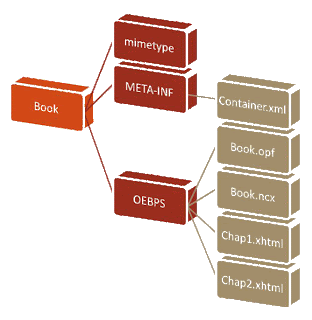
ePUB eBook. There are just two steps to making it readable on your eReader or in an on-screen eBook reader: Organize the files in folders according to the OeB 2.1 spec, and package them into a readable format.Organization
TheePUB spec has very specific instructions on how your book needs to be organized in order to be a valid ePUB. This includes- a folder to hold all the files
- the mimetype document
- a folder to hold the metadata (container.xml)
- a folder to hold the book files

Does it have to look just like this? The practical application of the spec allows some variation to the way things are set up, but this is the preferred organization. If you are just getting started with eBooks or are planning to distribute your books through a company that validates the code (like iPad store) stick with the recommended format and don't vary. You might as well do it right from the beginning.
Packaging the file
This is a section that sounds convoluted, but a following these instructions will produce a validePUB book. The first thing you need to do is create an empty .ZIP file. .ZIP is a file packaging and compression format that puts all the pieces together in a single package. - Create an empty
.ZIPfile. On the PC, right click in the directory you are working in. From the list of options, choose NEW:Compressed ZIP file. Name the file with your book's name. - Drag and drop the META-INF folder, the OEBPS folder, and the mimetype file onto the new
.ZIPfolder. - Right-click on the
.ZIPfolder and choose rename. Change the extension to.ePUB. A message will pop up on your screen saying that changing the extension might make the file unreadable. That's okay. Do it anyway.
.ePUB eBook now. Really. Open the new file with Adobe Digital Editions or another eBook reader on your computer, or put it in your eReader library and synchronize with your device. That really is how an ePUB is created. You can use the sample files from the previous lesson to test this by simply changing the .ZIP extension to .ePUB.Is this really all there is to it? Of course not. In the next lesson, we'll talk about making it look pretty!
Tuesday, August 10, 2010
Four Fiendish Files and a Header
Alas, nothing is as easy as it seems, and when it comes to ePUB, nothing even seems easy. Even though the
The
This header information should be the same for all the content files in your document. It defines the document as a
Anytime you create a new content file for your book, paste this code at the top, then continue with the same
File 1:
When an eReader encounters a book with the
Nothing else goes in this file. Save the file as "mimetype" and after you have closed it, edit the file name in your file explorer to remove the extension. You will get a warning message that changing the file extension might make the file unreadable, but that is okay. Just delete the four letters of the extension (including the period) and save the changes.
File 2:
This is also a very short text document with the
The only part of this file that ever changes is the "BookName" which is the name of the
File 3: The
The
There is a minimum of three sections in the package file: The metadata, the manifest, and the spine.
The
File 4: The
The
This information provides navigation points for sidebar navigation in various eBook readers and for assistive technologies. It is a required file for your conforming
Those are the four fiendish files that are required in every properly formed
In the next exercise, we'll work on properly organizing and packaging the eBook.
HTML file that you created in the last lesson is a valid Web page, the Open eBook specification requires a header for the file that tells devices how to interpret it, and it requires four separate files that need to be created in order to package the book for reading. In this lesson we'll look at those small adjustments.The XHTML header
This header information should be the same for all the content files in your document. It defines the document as a
XHTML document and describes the character set and language that will be used. The code is very simple and should just be copy and pasted in place of the <HTML> tag in your content file.<?xml version="1.0" encoding="UTF-8"?>
<!DOCTYPE html PUBLIC "-//W3C//DTD XHTML 1.1//EN" "http://www.w3.org/TR/xhtml11/DTD/xhtml11.dtd">
<html xmlns="http://www.w3.org/1999/xhtml" xml:lang="en">Anytime you create a new content file for your book, paste this code at the top, then continue with the same
HTML as previously discussed. That's the easy part. Now on to the four fiendish files.File 1: mimetype
When an eReader encounters a book with the
.ePUB extension, the first thing it checks for is whether it is actually an eBook. Many things could be packaged into an eBook format, but they won't read without a mimetype file. This is one short line of text in a text document with no extension. Simply open your text editor and in a new file type:application/epub+zipNothing else goes in this file. Save the file as "mimetype" and after you have closed it, edit the file name in your file explorer to remove the extension. You will get a warning message that changing the file extension might make the file unreadable, but that is okay. Just delete the four letters of the extension (including the period) and save the changes.
File 2: container.xml
This is also a very short text document with the
.XML file extension. Only one part of this file will change for each eBook you create: the name of the third fiendish file. Copy and paste the following into a text document.<?xml version="1.0"?>
<container version="1.0" xmlns="urn:oasis:names:tc:opendocument:xmlns:container">
<rootfiles>
<rootfile media-type="application/oebps-package+xml"
full-path="oebps/BookName.opf" />
</rootfiles>
</container>The only part of this file that ever changes is the "BookName" which is the name of the
.OPF file that defines your book. The container file tells the reader where the packaged eBook files are located. Save this text file and change the extension to .XML. Copy and paste the file into every eBook you create and just change the BookName to the current project.File 3: The .OPF package file
The
.OPF file is the one that defines what your book is, where all the pieces of it are located, and any information about the book (metadata) that you would like people to know. Metadata could include the ISBN, price, category, and a host of other information. For our purposes, we are going to create a .OPF with the absolute minimum information that must be included in order for the book to be considered a valid .ePUB file. This is a text file that contains XML elements that are defined by the Open eBook specification. The elements included here are the minumum set that are required. Once again, the term BookName is a placeholder used to define the specific files in your eBook.<?xml version="1.0" encoding="UTF-8"?>
<package xmlns="http://www.idpf.org/2007/opf" version="2.0" unique-identifier="BookName001">
<metadata xmlns:dc="http://purl.org/dc/elements/1.1/" xmlns:opf="http://www.idpf.org/2007/opf">
<dc:title>BookName</dc:title>
<dc:creator opf:role="aut">Author</dc:creator>
<dc:language>en</dc:language>
<dc:identifier id="bookid">BookName001</dc:identifier>
<metadata>
<manifest>
<item id="content" href="content.html" media-type="application/xhtml+xml"/>
<item id="toc" href="BookName.ncx" media-type="application/x-dtbncx+xml"/>
</manifest>
<spine toc="toc">
<itemref idref="content"/>
</spine>
</package>There is a minimum of three sections in the package file: The metadata, the manifest, and the spine.
- In the metadata you must include at least a title, creator, language, and unique identifier. Title is pretty obvious. Creator usually starts with the role of author. Other roles may also be defined, but we will not deal with those until a much later lesson. For our purposes, we are doing these lessons in English, therefore the language code is "en". We will look at other languages in the future. Finally, every book needs a unique identifier. This is referenced in two locations: in the metadata and in the
<package>element opening tag. This is supposed to be a combination of letters and numbers that uniquely identify this eBook from every other eBook that could ever be created. In some instances, the ISBN number may be used. In other cases, commercial software will generate a random code for the book. For now, we will use the BookName and three digits. You can change the numbers for each version of the file you create. - In the manifest, you will list every file that is to be included in reading your eBook. At minimum, the manifest will include the content file(s) for your eBook and the fourth fiendish file which will be discussed next. If your eBook contains multiple content files, graphics, fonts, or any other content, it will all need to be listed in this section.
- The spine lists the files that will appear in the Contents of your eBook. If you create a file for each chapter in the book, for example, each of those files will be listed in the spine.
The
.OPF is both the most complicated file in the eBook package and in many ways the most important. Save the text file and change the extension to .OPF.File 4: The .NCX Table of Contents
The
.NCX file provides the reading system with navigation points in your eBook and is required to be a conforming eBook. It has a few header items and then a listed table of contents with the names of the files (or locations within files) and the display name for each. It is a text file with the extension changed to .NCX.<?xml version="1.0" encoding="UTF-8"?>
<ncx version="2005-1" xml:lang="en" xmlns="http://www.daisy.org/z3986/2005/ncx/">
<head>
<meta content="toc-example" name="dtb:uid"/>
</head>
<docTitle><text>Table of Contents</text></docTitle>
<navMap>
<navPoint id="1" playOrder="1">
<navLabel>
<text>BookName</text>
</navLabel>
<content src="content.html"/>
</navPoint>
</navMap>
</ncx>This information provides navigation points for sidebar navigation in various eBook readers and for assistive technologies. It is a required file for your conforming
ePUB eBook. Save the file as a text file and then change the extension to .NCX. Those are the four fiendish files that are required in every properly formed
ePUB eBook. If you are not sure you've followed everything, I've created a small ZIP file of Aesop's Fables that includes all the pieces you see in this post. You can download it at NWE Signatures eBook Samples where I'll continue to post samples from these exercises.In the next exercise, we'll work on properly organizing and packaging the eBook.
Friday, August 6, 2010
Six tags you need to create an ePUB
I've been talking for some time about actually giving instruction on how to create your eBook and now it's time to get busy and do it. Most instruction sets I've found tell you everything you never wanted to know about xhtml before you ever get around to creating a book, but there are really only six xhtml tags that you need to know in order to set up your content. We're going to start right off by creating one.
First use a text editor. The simplest text editor you can get is best to start with. I use Windows Notepad for mine. You use a text editor instead of a word processor (Microsoft Word) because it does not automatically reformat text as you type. The first tag you will need is the <html> tag. That starts your document and at the very end of the document you will finish with the </html> closing tag. All tags come in pairs. The open tag is just the brackets and tagname. The closing tag includes a slash (/).
Second, the <head> tag encloses information about your book, not the book itself. Nested inside the head is the <title> tag. This is where you put the title of your book. We'll get to more sophisticated ways of using the header information in the future, but right now your file should look like this:
Even when you are creating complex books with hundreds of sections and sub-chapters, you will have these tags at the beginning of each xhtml or html document.
Now you are ready to put in your content. There are only three tags needed for the content. The beginning tag is <body>. It doesn't close until just before the closing tag. Everything else in your book is inside the body tag.
<h1> is the next tag and is used for your chapter heads. There are six different levels of heading available, but by-and-large it is safest and easiest to use the h1 tag for the top level of your chapter. Put the chapter name, number, or title after the opening h1 tag and then close the heading with the </h1> tag. Remember, tags (almost) always come in pairs.
Finally, each paragraph of your story must be enclosed in a <p></p> tag set. Here is a quick tip: In your word processor, before you put the text for your story in the text editor, do a search and replace for all paragraph breaks and replace them with the p tag. If you use a double-return to create space between paragraphs in your manuscript, replace the two together. For example: Replace ^p^p with </p>^p<p>. Then copy and paste your manuscript after the headline. It should come out looking like this.
Save the file as an html file (with the .html extension) When you look at the file in your directory, if it says .txt at the end of the name, rename the file with the extension .html. Ignore all warnings about whether it will be readable. Finally, double-click on the icon for your new book and take a look at it. It will open in your default Web browser. It won't look pretty, but it will be accurate, and you created this little Web page with just six tags. Easy, wasn't it?
In the next lesson, we'll create the two files that need to be included in your eBook and package it up so you can view it in your reader.
First use a text editor. The simplest text editor you can get is best to start with. I use Windows Notepad for mine. You use a text editor instead of a word processor (Microsoft Word) because it does not automatically reformat text as you type. The first tag you will need is the <html> tag. That starts your document and at the very end of the document you will finish with the </html> closing tag. All tags come in pairs. The open tag is just the brackets and tagname. The closing tag includes a slash (/).
Second, the <head> tag encloses information about your book, not the book itself. Nested inside the head is the <title> tag. This is where you put the title of your book. We'll get to more sophisticated ways of using the header information in the future, but right now your file should look like this:
<html>
<head>
<title>My Book</title>
</head>
</html>
Even when you are creating complex books with hundreds of sections and sub-chapters, you will have these tags at the beginning of each xhtml or html document.
Now you are ready to put in your content. There are only three tags needed for the content. The beginning tag is <body>. It doesn't close until just before the closing tag. Everything else in your book is inside the body tag.
<h1> is the next tag and is used for your chapter heads. There are six different levels of heading available, but by-and-large it is safest and easiest to use the h1 tag for the top level of your chapter. Put the chapter name, number, or title after the opening h1 tag and then close the heading with the </h1> tag. Remember, tags (almost) always come in pairs.
Finally, each paragraph of your story must be enclosed in a <p></p> tag set. Here is a quick tip: In your word processor, before you put the text for your story in the text editor, do a search and replace for all paragraph breaks and replace them with the p tag. If you use a double-return to create space between paragraphs in your manuscript, replace the two together. For example: Replace ^p^p with </p>^p<p>. Then copy and paste your manuscript after the headline. It should come out looking like this.
<html>
<head>
<title>My Book</title>
</head>
<body>
<h1>Chapter 1</h1>
<p>First paragraph goes here.</p>
<p>Second paragraph goes here.</p>
</body>
</html>
Save the file as an html file (with the .html extension) When you look at the file in your directory, if it says .txt at the end of the name, rename the file with the extension .html. Ignore all warnings about whether it will be readable. Finally, double-click on the icon for your new book and take a look at it. It will open in your default Web browser. It won't look pretty, but it will be accurate, and you created this little Web page with just six tags. Easy, wasn't it?
Chapter 1
First paragraph goes here.
Second paragraph goes here.
In the next lesson, we'll create the two files that need to be included in your eBook and package it up so you can view it in your reader.
Subscribe to:
Comments (Atom)